Archives

All posts for the month July, 2015

The Kabuki Brush-My Favorite Makeup Brush Ever. 

Published July 28, 2015 by shepic83

I have always been obsessed with makeup brushes. Usually (after drooling over the new sparkly eyeshadow palettes, of course), that is the first area I will immediately run to while in Sephora, Ulta, or any Department store selling makeup.

There is such a great variety of brushes out there, some that I had no idea even existed. There is literally a brush specifically tailored for every single type of makeup application imaginable. This can sometimes be overwhelming, not to mention expensive!

But if you are ever in doubt of which type of brush to go with, ALWAYS choose the Kabuki brush. They are amazingly diverse, and while often pricey, you can’t go wrong, because there are just so many different ways to use it (in other words, you will definitely get your money’s worth)!

Kabuki brushes can be used to apply mineral powders, all-over bronzers, HD powders, setting powders, and highlighters, to name a few. My personal favorite use though, is to blend the makeup that has already been applied to your face, to soften any lines or creases, and remove any excess product. The brush’s synthetic bristles instantly create a smooth, even finish, making your face look flawless in a matter of seconds!

My recommendation: the Dior Kabuki Brush (#17), from their Backstage Brush line.  It’s slightly pricey at $52, but well-worth the investment. It NEVER sheds, is handmade and the all-natural hairs are never cut to ensure ultimate softness.


If you’re looking for something a bit less expensive to initially experiment with, try the adorably compact ‘Too Faced’ Kabuki brush for $32. According to reviews on Truebeauty.com, it “feels heavenly on your skin”, “buffs powder on beautifully, and minimizes pores like nobody’s business.”

**(This post was inspired by hollypopmatthews’ post on her Makeup Brush Collection from this morning.) 🙂
Do YOU have a favorite type/brand of Kabuki brush, or any tips/tricks to using them that you want to share? Let me know! 

How To Properly Clean Your Makeup Brushes

Published July 27, 2015 by shepic83

photo-1

How to Properly Clean Your Makeup Brushes

Cleaning makeup brushes is a time consuming, annoying process, and as a result is often neglected even though it is essential for hygienic purposes, as well as maintaining the integrity of your brushes.
Not surprisingly, a study at Loyola Marymount University found that there were significant amounts of bacterial activity on unwashed makeup brushes after just one week, and after two weeks, the bacteria had doubled.
Using bacteria-ridden brushes on your skin can cause acne and may even result in more serious problems, such as eye and skin infections. To make matters even worse, contaminated brushes can also transfer these unwanted germs into whichever products you are dipping them into.
Additionally, brushes that come into contact with cream or liquid products are even bigger breeding grounds for bacteria, as they thrive in moist conditions.

How to Properly Clean Your Brushes:

Put a squirt of a mild facial cleanser or shampoo onto your hand and swirl the brush around in it, letting water lightly run over your hand from the faucet. (Try your best to keep the handle of your brush dry to prevent the glue that holds it together from breaking down.) It is recommended to clean your brushes at least once per week.

How to Properly Dry Your Brushes:

It is best to clean your brushes at night, because it takes about 6-8 hours for them to dry completely. Lay your freshly cleansed brushes on a paper towel (which absorbs moisture better and faster than on a cotton or terry cloth towel). It is also very important to let your brushes dry flat, because it allows them to better maintain their shape.
It can be tempting to use a hair dryer to speed up the drying process, but this should be avoided, as the direct heat can melt the glue used to hold your brushes together. This can result in the shedding of your brush hairs, or even worse, make your brushes completely unusable.

In Between Cleanings:

Sometimes it is necessary to clean your brushes in between your regularly weekly cleansing process, especially if you are switching between highly pigmented colors (for a smokey eye application, etc). In this case, a store-bought daily brush cleaner spray can be useful. I would highly recommend Elf’s Daily Brush Cleaner ($3 at Target).

Elf

To use, simply spray brush several times after use, then wipe off on a clean towel or cloth to remove makeup. Allow to fully dry before next use.

Tell me, How do you clean YOUR brushes and how often?

Dry Brushing

Published July 26, 2015 by shepic83

Dry brushing is a popular spa technique that is an effective way to improve the appearance of your skin, and provide other health benefits as well. It is a great way to remove excess dead skin cells to make your skin look instantly brighter, smoother, and tighter (no gym membership required)! Recent studies have also determined that dry brushing (combined with other aspects of a healthy lifestyle) can also reduce the appearance of cellulite, improve kidney functions, and remove excess toxins from your body.

                    How It Works:

Dry brushing stimulates both the circulation and lymphatic system, which helps to rid the body of excess fluid and toxins, which in turn can also reduce the appearance of cellulite. Another added bonus: I’ve also found dry brushing to be great for exfoliating before using self-tanner.

                   How to Proceed:

  • Using a long handled, natural-bristled body brush, dry brush dry, bare skin twice a day before showering.
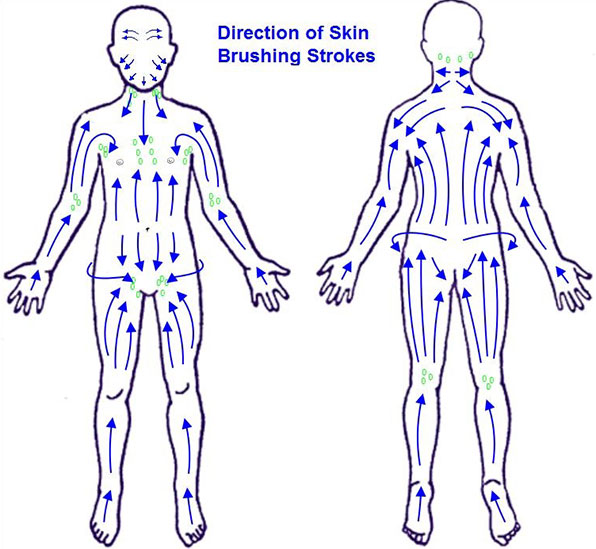
  • Begin with the bottoms of your feet, brushing them completely and vigorously in a circular motion, then move upward to the ankles, calves, thighs, stomach, arms, and hands. Be sure that you are brushing TOWARDS the heart, because this is where the lymphatic system naturally drains (please see the diagrams that follow for proper technique).
  • After brushing, shower with warm water to cleanse any leftover dead skin cells that you’ve just exfoliated. At the end of your shower, rinse with water as cold as you can stand it, to aid in additional blood circulation. Dry your skin completely with a towel (for additional exfoliation and circulation benefits).
  • Moisturize your skin thoroughly with a good lotion, or oil (such as coconut, olive, or almond).
  • Bonus tip: Sipping a cup of hot water with lemon during this process or right afterwards, can also help aid in the digestion process. 

       Full Benefits of Dry Brushing:

    • Aids in body circulation

    • Exfoliates the top layer of dead skin to unclog pores

    • Helps to regulate hormones

    • Stimulates the lymphatic system and detoxifies

    • Minimizes the appearance of cellulite

    • Boosts the immune system

    • Improves muscle tone

    • Decreases muscle tension and fluid retention

    • Stimulates nerve cells

    • Improves kidney and liver function

    • Increases energy

    • Stimulates blood flow to the surface of your skin for a healthy glow

drybrushbest

Bare Minerals ‘Round the Clock 6 PM – My New Favorite Eyeliner.

Published July 24, 2015 by shepic83

I attended a Master Makeup Class at Bare Escentuals this week with some of my favorite fellow Esti graduates, and not only did I score some sweet free Bare Minerals loot-

But I also discovered my new absolute favorite eyeliner, ever: ‘Round The Clock 6 PM’ (Violet).

I happened to choose violet because I have blue eyes, and purple pigments make blue stand out, but this amazing cream liner also comes in all of these fun, highly pigmented colors as well:


The reason I love this liner so much is because it’s actually waterproof, and when I say waterproof, I mean waterproof. I actually went swimming with this liner on and I swear to you that it literally did NOT budge. I also have pretty watery eyes (due to allergies and contact lenses), and on a typical workday, most “waterproof” eyeliners would be smudged under my eyes like a raccoon before lunch.

This liner, however, consistently stayed put, both on my actual waterline and my lid, from about 8 AM until well-past midnight. For me, the only time this stuff will come off, is with an oil-based makeup remover!! Each liner also comes with a sharpener, which is always a plus!

I would NOT recommend this product to those looking to do winged liner, or to anyone who likes a very thin, precise application along the lash line, as it is very creamy, and may turn out thicker than desired.

$16 – Bare Minerals

DIY Pink Peek-a-Boo Highlights

Published July 24, 2015 by shepic83

Lately I’ve been obsessed with dying my hair pink. I’ve always done blonde highlights, since I was about 13-years old, but I decided recently that I wanted to switch things up a bit, and jump on this trendy bandwagon of super girly candy-colored highlights. I didn’t want to spend anymore money on my hair than I already do for my regular go-to platinum highlights, so instead, I decided to be brave and try some drugstore box dye to see if I could create something myself at home.

So I ventured out to Target (my own little personal Heaven) and picked up a box of SPLAT, in Pink Fetish.


I then pulled a few random strands of my already bleached hair from underneath, and slathered on this almost obnoxiously-colored fuscia mixture. I let the color develop for about 30-minutes, washed it out until the water ran clear, and I ended up with this initially terrifying result-


…UNTIL I put the rest of my hair down to reveal some perfectly pink-ish peek-a-boo highlights, all in less than an hour, AND for less than $10.


My overall review: I would highly recommend this stuff if you’re feeling brave, of course! At first glance, this intense color can be quite shocking, but gets less bright after only a few washes!

If you’re looking for a less permanent alternative, try:


This product produces similar results, although the color turns out less fuscia and more like an actual hot pink. This color rinses out in just one wash (but lasted even less than that for me).

Skin Mapping

Published July 24, 2015 by shepic83

Skin Mapping is an ancient technique  rooted in Ayurvedic teachings, that basically connect different parts of your face to corresponding organs and/or body parts. This allows you to then determine what specific internal issues are likely causing your acne flare ups or inflammation, so you can then treat them accordingly.

There are several versions of skin maps out there, but I found this one in particular to be one of the best and most thorough I’ve seen thus far.

It’s truly amazing how many things you can learn about your body and your health through your skin!

   Credit to: Dermalogica.com

How I Got Here.

Published July 23, 2015 by shepic83

Its no secret to anyone that knows me that I’ve been a beauty product junkie for years. Anything even remotely related to skincare, makeup, hair and/or nails has always been at the forefront of my attention since I was old enough to sneak into my mom’s vanity drawers and “experiment” with her collection of Mary Kay and Avon products in the 80’s.

In fact, many of my earliest childhood memories consist of time spent walking around awkwardly in my mothers brightly colored heels, smearing her fuscia lipstick and purple eyeshadow all over my face, and secretly rummaging through her closet for sparkly dresses to wear while strutting down my pretend “runway” in our living room.

It wasn’t until very recently, after years of half-heartedly studying journalism in college, did I decide to finally turn my lifelong passion into an actual career. I got a job as a Wellness Consultant at a local Spa, learned the Business and fell in love, then went back to school to become a licensed Esthetician. I just graduated from my 600-hour course, was accepted for my temporary license, and I take the State Board exam next month! I could not be happier with my decision.

In the meantime, and throughout my new career as a Skincare Professional, I will be blogging everything I know about any and all skincare tips and tricks, product experiences/reviews, makeup applications, and information about all of the latest trends in the beauty industry.

I Hope you all enjoy, and thanks for reading! Please send any recommendations, opinions, thoughts  ideas or questions to my email address listed in my contact information on my site!
Xoxo, Stef