Skincare

All posts in the Skincare category

Damage Control for Tired, Stressed Skin

Published September 22, 2015 by shepic83

  
None of us are perfect. Even the best of us, have those nights where we party too hard, don’t sleep enough, or get stressed out over things beyond our control. All of these things directly affect our skin, but perhaps the worst offense is inadequate sleep. Your skin repairs itself overnight, and if you don’t get an adequate amount of sleep, the effects show up on your skin almost immediately.

According to Los Angeles Dermatologist, Dr. Howard Murad, “Dehydrated skin, puffy eyes, dark circles, and sallow or ashy complexions are characteristics of a poor night’s rest. There’s a lot happening with your skin at night, and sleep enables the body to reverse everyday free radical damage through cellular renewal.”

In addition, sleep also reduces Cortisol (the stress hormone) which causes discoloration and thinning skin. It also increases Melatonin (the sleep hormone), which acts as an antioxidant to combat fine lines, wrinkles and age spots. Adequate sleep also increases the efficiency of growth hormones that repair and regenerate cells that produce collagen, which is responsible for your skin’s elasticity.

When you’re not able to get a perfect night’s sleep, there is still hope! Here are my go-to tips for improving stressed out/tired skin, that will have you looking and feeling like yourself again in no time.

1. Cleanse Thoroughly & Massage

First, prep your skin by cleansing thoroughly with a gentle cleanser to remove any oils, leftover makeup and dirt. A good one to try is Murad’s Refreshing Cleanser ($36). Be sure to also give yourself a good mini facial massage while your lathering up your cleanser.

Really concentrate on your eye area by gently tapping your fingers around your orbital bone in a clockwise motion to increase circulation, which helps to decrease dark circles and puffiness.

Then firmly pinch along your eyebrow area back and forth with your thumb and forefinger to prevent drooping eyelids. Do this about four to five times.

Next, make small, firm “c” shaped strokes with your fingers along your forehead to relax your muscles and lessen the appearance of fine lines. Do this back and forth about 5 times or so.

Finally, use brisk pinching motions with your thumb and forefinger all over your face to decrease any extra puffiness and further brighten your overall complexion.

After a good cleanse,  your skin is now clean and ready to exfoliate!

2. Exfoliate Gently

If you didn’t get the proper amount of shut-eye, then your skin did not reap the benefits of the natural exfoliation process that happens while you’re asleep. “While cells repair and rebuild at all stages of sleep, the majority of cell turnover and regeneration occurs during deep REM [rapid eye movement] sleep,” says Dr. Murad.

You can mimic this process by using a good exfoliator in the morning instead. Be sure to use one with soft, natural, round kernals or beads to avoid any added irritation. Also try to avoid any products with glycolic or salicylic acid when your skin is already stressed out, which may cause you to appear red or blotchy.

My favorite exfoliator right now is the Micro Exfoliating Honey Cleanser, by Circadia ($36) This particular product is even gentle enough to use every day, which most other exfoliator are not. Using a good exfoliator will instantly brighten your complexion and even out your skin tone, making you look less tired.

3. Further Decrease any Leftover Puffiness

If your skin is puffy, especially around your eye-area, try this quick tip for instant results:

Fill your bathroom sink (or a large bowl) with cold water, and toss in a bunch of ice cubes (about 10-12). Then pour 1/3 of a cup of natural or organic witch hazel (without alcohol) into the water. Dunk your face in and out of the water 10 times, submerging your entire face each time.

Cold temperatures shrink will capillaries in the skin and stimulate lymph drainage, while the witch hazel has natural anti-inflammatory, puffiness-reducing properties.

4. Moisturize Well

Because tired skin lacks adequate oil production and did not experience the proper amount of cell turnover during the night, skin can appear drier and duller than usual. This means you need to moisturize! After exfoliating, the skin is now more receptive to products applied afterwards, and they will penetrate much more effectively than before. This is when you will want to apply your moisturizer! You will want to use a moisturizer that is packed full of Hyaluronic Acid, which binds moisture most effectively. I love Dermalogica’s Pure Light with SPF 50 ($60) or Anavita Moisturizing Anti-Wrinkle Cream ($77).

5. Apply Eye Cream

Finally you will want to apply a great soothing eye cream that both moisturizers effectively to reduce wrinkles and dullness and increases circulation to reduce the appearance of dark circles. I love Dermalogica’s Age Smart Multivitamin Power Firm ($58), because it goes on silky, not greasy, and I noticed a difference in my puffiness and dark circles instantly! Over time, I also noticed a complete reduction overall in the fine lines under my eyes. I also like Mario Badescu’s Ceramide Eye Gel ($18), because the cooling gel formula instantly refreshes the eye area, and reduced my puffiness and circles in within about five minutes. Try storing it in the fridge for an even cooler sensation, and it works even faster if it’s kept cold.

Stay tuned for my next Damage Control post on how to further improve tired, stressed skin through your makeup application!

*Tell me, do you have any tips/tricks or go-to products that work for you when your skin looks tired or dull? Or if you’ve tried any of my recommendations, have they worked for you?*

The Oil Cleansing Method

Published September 12, 2015 by shepic83

I was first introduced to cleansing with oil while I was in Aesthetics school. Before this point, I had never even heard of cleansing with oil, and the mere thought of it made me cringe. I already had somewhat oily skin and was prone to developing breakouts, so putting oil on my face was the last thing I had wanted to do. This was of course until I received my first Babor facial in clinic. Babor was the product line we used for the major of our facials on clients, and their primary cleanser is Hy-Ol, which is a hydrophilic oil cleanser, containing soybean, sesame, and peanut oil. The second part to the Babor cleanse included a product called Phytoactive, which was an activator that was to be put on after the Hy-Ol, and is used to address specific skin types such as those with sensitive or mature skin. These are GREAT products, although somewhat pricey ($36 for the Hy-Ol and $29 for the phytoactive) and they are a GREAT introduction to oil cleansing. (Note: Other oil cleansers do not require an activator, and are usually more affordable.) 

After my first Babor facial, I immediately purchased this 2-step cleanser because of the amazing results I got from just ONE use. My skin instantly looked dewy and healthy, and it felt even better. The usual oil buildup in my t-zone was barely noticeable, my pores appeared much smaller, and my complexion was glowing. From that point forward, I would never go back to cleansing with anything but oil.

Here is how the oil cleansing method works: 

No matter what the skin type, cleansing oil mixes with the preexisting oils already on your face. These oils can either be caused by naturally produced sebum, or buildup from makeup or other products left on your face. When you rinse during cleansing, the “good oil” from the cleanser, takes the “bad oil” as well as dirt/makeup with it. Cleansing oil basically acts like a magnet by binding to surface impurities, and rinsing them away without clogging your pores. Your skin is then left feeling clean, soft and hydrated. (Oil cleansers are GREAT for removing stubborn eye makeup as well, and may eliminate your need to use an additional makeup remover during your daily regimen. The fewer steps the better!)

Many other types of cleansers are often too harsh for our skin, and while they too will work to remove impurities, they also strip skin of all of its natural oils. This leaves skin unbalanced and dry, causing it to then OVERPRODUCE oil, to compensate. This excess oil production causes clogged pores, oily t-zones, and breakouts, which is what we are always trying to avoid! Oil cleansers essentially maintain the skin’s natural pH. Another added bonus – essential oils are also naturally antibacterial, thus helping to prevent future breakouts or infections.

After school (and my free facials and product discounts) had ended, I was back on a budget and had to do a little research on my own to see which oil cleansing product alternatives (to the pricey Babor line) were out there. Oil cleansing is a fairly new trend in the skincare industry, so there aren’t a TON of products out there yet, but there are a few great ones that I’ve tried, that I was very impressed with.

Here are some of my favorites:

Phyto-hyol

Babor Hy-Ol ($36) and Phytoactive ($29)

murad

Murad Cleansing Oil for Face Eyes and Lips – $32, Murad.com68779-Mineralixir-Facial-Cleansing-Oil-0Bare Minerals Mineralixirs Facial Cleansing Oil – $21 – BareMinerals

spd_20130227165510_b

Shu Uemura High Performance Balancing Cleansing Oil ($67, Sephora)

Tell Me: Have YOU ever oil cleansed? Do you have any tips or product recommendations? Good/Bad experiences? 

Dry Brushing

Published July 26, 2015 by shepic83

Dry brushing is a popular spa technique that is an effective way to improve the appearance of your skin, and provide other health benefits as well. It is a great way to remove excess dead skin cells to make your skin look instantly brighter, smoother, and tighter (no gym membership required)! Recent studies have also determined that dry brushing (combined with other aspects of a healthy lifestyle) can also reduce the appearance of cellulite, improve kidney functions, and remove excess toxins from your body.

                    How It Works:

Dry brushing stimulates both the circulation and lymphatic system, which helps to rid the body of excess fluid and toxins, which in turn can also reduce the appearance of cellulite. Another added bonus: I’ve also found dry brushing to be great for exfoliating before using self-tanner.

                   How to Proceed:

  • Using a long handled, natural-bristled body brush, dry brush dry, bare skin twice a day before showering.
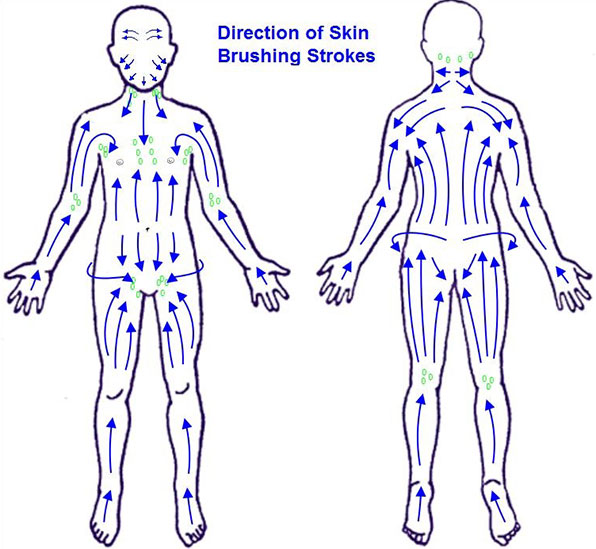
  • Begin with the bottoms of your feet, brushing them completely and vigorously in a circular motion, then move upward to the ankles, calves, thighs, stomach, arms, and hands. Be sure that you are brushing TOWARDS the heart, because this is where the lymphatic system naturally drains (please see the diagrams that follow for proper technique).
  • After brushing, shower with warm water to cleanse any leftover dead skin cells that you’ve just exfoliated. At the end of your shower, rinse with water as cold as you can stand it, to aid in additional blood circulation. Dry your skin completely with a towel (for additional exfoliation and circulation benefits).
  • Moisturize your skin thoroughly with a good lotion, or oil (such as coconut, olive, or almond).
  • Bonus tip: Sipping a cup of hot water with lemon during this process or right afterwards, can also help aid in the digestion process. 

       Full Benefits of Dry Brushing:

    • Aids in body circulation

    • Exfoliates the top layer of dead skin to unclog pores

    • Helps to regulate hormones

    • Stimulates the lymphatic system and detoxifies

    • Minimizes the appearance of cellulite

    • Boosts the immune system

    • Improves muscle tone

    • Decreases muscle tension and fluid retention

    • Stimulates nerve cells

    • Improves kidney and liver function

    • Increases energy

    • Stimulates blood flow to the surface of your skin for a healthy glow

drybrushbest

Skin Mapping

Published July 24, 2015 by shepic83

Skin Mapping is an ancient technique  rooted in Ayurvedic teachings, that basically connect different parts of your face to corresponding organs and/or body parts. This allows you to then determine what specific internal issues are likely causing your acne flare ups or inflammation, so you can then treat them accordingly.

There are several versions of skin maps out there, but I found this one in particular to be one of the best and most thorough I’ve seen thus far.

It’s truly amazing how many things you can learn about your body and your health through your skin!

   Credit to: Dermalogica.com