Damage Control for Tired, Stressed Skin

Published September 22, 2015 by shepic83

  
None of us are perfect. Even the best of us, have those nights where we party too hard, don’t sleep enough, or get stressed out over things beyond our control. All of these things directly affect our skin, but perhaps the worst offense is inadequate sleep. Your skin repairs itself overnight, and if you don’t get an adequate amount of sleep, the effects show up on your skin almost immediately.

According to Los Angeles Dermatologist, Dr. Howard Murad, “Dehydrated skin, puffy eyes, dark circles, and sallow or ashy complexions are characteristics of a poor night’s rest. There’s a lot happening with your skin at night, and sleep enables the body to reverse everyday free radical damage through cellular renewal.”

In addition, sleep also reduces Cortisol (the stress hormone) which causes discoloration and thinning skin. It also increases Melatonin (the sleep hormone), which acts as an antioxidant to combat fine lines, wrinkles and age spots. Adequate sleep also increases the efficiency of growth hormones that repair and regenerate cells that produce collagen, which is responsible for your skin’s elasticity.

When you’re not able to get a perfect night’s sleep, there is still hope! Here are my go-to tips for improving stressed out/tired skin, that will have you looking and feeling like yourself again in no time.

1. Cleanse Thoroughly & Massage

First, prep your skin by cleansing thoroughly with a gentle cleanser to remove any oils, leftover makeup and dirt. A good one to try is Murad’s Refreshing Cleanser ($36). Be sure to also give yourself a good mini facial massage while your lathering up your cleanser.

Really concentrate on your eye area by gently tapping your fingers around your orbital bone in a clockwise motion to increase circulation, which helps to decrease dark circles and puffiness.

Then firmly pinch along your eyebrow area back and forth with your thumb and forefinger to prevent drooping eyelids. Do this about four to five times.

Next, make small, firm “c” shaped strokes with your fingers along your forehead to relax your muscles and lessen the appearance of fine lines. Do this back and forth about 5 times or so.

Finally, use brisk pinching motions with your thumb and forefinger all over your face to decrease any extra puffiness and further brighten your overall complexion.

After a good cleanse,  your skin is now clean and ready to exfoliate!

2. Exfoliate Gently

If you didn’t get the proper amount of shut-eye, then your skin did not reap the benefits of the natural exfoliation process that happens while you’re asleep. “While cells repair and rebuild at all stages of sleep, the majority of cell turnover and regeneration occurs during deep REM [rapid eye movement] sleep,” says Dr. Murad.

You can mimic this process by using a good exfoliator in the morning instead. Be sure to use one with soft, natural, round kernals or beads to avoid any added irritation. Also try to avoid any products with glycolic or salicylic acid when your skin is already stressed out, which may cause you to appear red or blotchy.

My favorite exfoliator right now is the Micro Exfoliating Honey Cleanser, by Circadia ($36) This particular product is even gentle enough to use every day, which most other exfoliator are not. Using a good exfoliator will instantly brighten your complexion and even out your skin tone, making you look less tired.

3. Further Decrease any Leftover Puffiness

If your skin is puffy, especially around your eye-area, try this quick tip for instant results:

Fill your bathroom sink (or a large bowl) with cold water, and toss in a bunch of ice cubes (about 10-12). Then pour 1/3 of a cup of natural or organic witch hazel (without alcohol) into the water. Dunk your face in and out of the water 10 times, submerging your entire face each time.

Cold temperatures shrink will capillaries in the skin and stimulate lymph drainage, while the witch hazel has natural anti-inflammatory, puffiness-reducing properties.

4. Moisturize Well

Because tired skin lacks adequate oil production and did not experience the proper amount of cell turnover during the night, skin can appear drier and duller than usual. This means you need to moisturize! After exfoliating, the skin is now more receptive to products applied afterwards, and they will penetrate much more effectively than before. This is when you will want to apply your moisturizer! You will want to use a moisturizer that is packed full of Hyaluronic Acid, which binds moisture most effectively. I love Dermalogica’s Pure Light with SPF 50 ($60) or Anavita Moisturizing Anti-Wrinkle Cream ($77).

5. Apply Eye Cream

Finally you will want to apply a great soothing eye cream that both moisturizers effectively to reduce wrinkles and dullness and increases circulation to reduce the appearance of dark circles. I love Dermalogica’s Age Smart Multivitamin Power Firm ($58), because it goes on silky, not greasy, and I noticed a difference in my puffiness and dark circles instantly! Over time, I also noticed a complete reduction overall in the fine lines under my eyes. I also like Mario Badescu’s Ceramide Eye Gel ($18), because the cooling gel formula instantly refreshes the eye area, and reduced my puffiness and circles in within about five minutes. Try storing it in the fridge for an even cooler sensation, and it works even faster if it’s kept cold.

Stay tuned for my next Damage Control post on how to further improve tired, stressed skin through your makeup application!

*Tell me, do you have any tips/tricks or go-to products that work for you when your skin looks tired or dull? Or if you’ve tried any of my recommendations, have they worked for you?*

The Oil Cleansing Method

Published September 12, 2015 by shepic83

I was first introduced to cleansing with oil while I was in Aesthetics school. Before this point, I had never even heard of cleansing with oil, and the mere thought of it made me cringe. I already had somewhat oily skin and was prone to developing breakouts, so putting oil on my face was the last thing I had wanted to do. This was of course until I received my first Babor facial in clinic. Babor was the product line we used for the major of our facials on clients, and their primary cleanser is Hy-Ol, which is a hydrophilic oil cleanser, containing soybean, sesame, and peanut oil. The second part to the Babor cleanse included a product called Phytoactive, which was an activator that was to be put on after the Hy-Ol, and is used to address specific skin types such as those with sensitive or mature skin. These are GREAT products, although somewhat pricey ($36 for the Hy-Ol and $29 for the phytoactive) and they are a GREAT introduction to oil cleansing. (Note: Other oil cleansers do not require an activator, and are usually more affordable.) 

After my first Babor facial, I immediately purchased this 2-step cleanser because of the amazing results I got from just ONE use. My skin instantly looked dewy and healthy, and it felt even better. The usual oil buildup in my t-zone was barely noticeable, my pores appeared much smaller, and my complexion was glowing. From that point forward, I would never go back to cleansing with anything but oil.

Here is how the oil cleansing method works: 

No matter what the skin type, cleansing oil mixes with the preexisting oils already on your face. These oils can either be caused by naturally produced sebum, or buildup from makeup or other products left on your face. When you rinse during cleansing, the “good oil” from the cleanser, takes the “bad oil” as well as dirt/makeup with it. Cleansing oil basically acts like a magnet by binding to surface impurities, and rinsing them away without clogging your pores. Your skin is then left feeling clean, soft and hydrated. (Oil cleansers are GREAT for removing stubborn eye makeup as well, and may eliminate your need to use an additional makeup remover during your daily regimen. The fewer steps the better!)

Many other types of cleansers are often too harsh for our skin, and while they too will work to remove impurities, they also strip skin of all of its natural oils. This leaves skin unbalanced and dry, causing it to then OVERPRODUCE oil, to compensate. This excess oil production causes clogged pores, oily t-zones, and breakouts, which is what we are always trying to avoid! Oil cleansers essentially maintain the skin’s natural pH. Another added bonus – essential oils are also naturally antibacterial, thus helping to prevent future breakouts or infections.

After school (and my free facials and product discounts) had ended, I was back on a budget and had to do a little research on my own to see which oil cleansing product alternatives (to the pricey Babor line) were out there. Oil cleansing is a fairly new trend in the skincare industry, so there aren’t a TON of products out there yet, but there are a few great ones that I’ve tried, that I was very impressed with.

Here are some of my favorites:

Phyto-hyol

Babor Hy-Ol ($36) and Phytoactive ($29)

murad

Murad Cleansing Oil for Face Eyes and Lips – $32, Murad.com68779-Mineralixir-Facial-Cleansing-Oil-0Bare Minerals Mineralixirs Facial Cleansing Oil – $21 – BareMinerals

spd_20130227165510_b

Shu Uemura High Performance Balancing Cleansing Oil ($67, Sephora)

Tell Me: Have YOU ever oil cleansed? Do you have any tips or product recommendations? Good/Bad experiences? 

The Best (and Quickest!) Beach Wave Method, Ever.

Published August 25, 2015 by shepic83

I’m seriously obsessed with beach-waved hair. It is one of my absolute favorite things about summer! It’s incredibly easy, requires NO hair dryer, and barely any effort, but yet it can produce the most incredible results- if done correctly.
Below I have outlined the best way to achieve effortless beach hair, without even setting foot on the beach!

You will need the following items:

-Salt Spray: there are many great products out there, but my favorite happens to be Bumble & Bumble’s Surf Spray ($27-Sephora)
*You can even make your own by adding one cup of warm water with 1 tbsp of all-natural sea salt and 2 tsp of coconut or argan oil (optional for added moisture) to a spray bottle, and shake to combine.

-Atleast 4 small elastic rubber bands

-A spray bottle filled with water

-Optional: A flat-iron (I use a T3 ceramic iron)

Instructions:

1. Divide second-day hair into 4 sections.

2. Twist each section tightly AWAY from your face, and spray with water until damp. Then spray again with the salt spray.

3. Coil the coated, twisted section a “cinnamon roll-shaped” bun, and secure with an elastic hair tie, leaving out just the ends of the hair.

(Pictured below. Please don’t mind the lack of makeup and glasses.)


4. Spray bun again with salt spray.

5. Repeat for all 4 sections.

(Note: You can divide hair into more than 4 sections if you prefer a tighter more pronounced curl, or if you have very thick hair.)

6. Let air dry completely (the longer the better!) and then undo each section.

It should look like this when you undo each section:


7. Straighten just the ends of hair, if desired, and then carefully pull apart each section to separate waves.

8. Flip hair upside down and tousle hair slightly.

*Optional: Spray some dry shampoo just to the roots to create added volume.

The Finished Result:

 
Voila!

Now go out and enjoy the beautiful summer sunshine while it lasts!

The Best Dry Shampoo EVER

Published August 15, 2015 by shepic83

It’s no secret to anyone that knows me, that I have a legitimate obsession with Dry Shampoo. Every time I am in Sephora, a salon, or pretty much any drugstore for that matter, I make a beeline for the dry shampoo selection. I will often pick up two to three different bottles to try at a time because I am always looking for something better.

Due to my complete lack of patience with everyday styling, or even just washing my hair, my obsession with braids (so much easier with dry shampoo!), and my love for textured tresses, I have tried pretty much every single brand on the market. I’ve tried the sprays, the powders, the low-end, and the high-end…you name it, I’ve experimented with it at least once. Unfortunately, I have never been completely satisfied with any of them for one reason or another. Either the scent wasnt quite right, it was too noticeable on my roots, it was sticky, or it just plain didn’t get the job done!
That was until I tried Batiste. I just happened to see this little gem at Ulta, and decided to try it out. The packaging immediately drew me in. The design is super colorful and very retro. The perfectly reasonable price ($6.99!!) was another lovely feature, as I have paid over $30 for mediocre dry shampoos in the past. There are also over ten different scents, but I chose “Blush.”

I quickly rushed home, eager to try this new product (especially since I hadn’t washed my hair in two days at that point)! I followed the directions on the bottle…shake vigorously, spray on roots, and massage product into scalp. I then added a little more to the rest of my hair for added texture, and brushed through to the ends.

Right off the bat, the scent caught my attention. it smelled like baby powder, but not overwhelmingly so…just a nice subtle refreshing, clean scent. (This would be perfect for those who smoke, or for times when you want to disguise the fact that you were just at the gym, and didn’t have time to shower before work.)

I then noticed my hair. It literally looked like I had just gotten a blowout from the salon, which was mind-blowing to me being that I hadn’t even showered that day! I threw a few quick braids in my hair, straightened the ends, and went off to work.

Eight full hours later, my hair still smelled fresh, and looked even fresher. The dry shampoo lasted through my ENTIRE workday.

Never before had I discovered a dry shampoo that met ALL of my criteria- cheap, effective, and most importantly, not obvious to others.

This product will change your life!


Ulta- $6.99

Monday Quick Tip: INSTANTLY Whiter Teeth

Published August 3, 2015 by shepic83

Here’s my Monday quick beauty tip, cause ‘ain’t nobody got time for time consuming projects on Mondays! Amiright?!   

  These three ingredients are literally life-changing!

 
 If you want instantly, (yes I said instantly) whiter teeth, combine these ingredients (as instructed below), brush like usual, and repeat 3 times a week! The end. 
“Instantly Whiten Up” Recipe:

Add 1tsp of baking soda into a small container, then slowly add just enough Hydrogen Peroxide to make a paste. Add a small amount of your usual toothpaste. Combine. Add mixture to your toothbrush, then brush as usual. (Mixture May last for up to two uses.) 

 
Have YOU tried this yet?? If so, did you notice results? Did others?! Let me know! 

The Kabuki Brush-My Favorite Makeup Brush Ever. 

Published July 28, 2015 by shepic83

I have always been obsessed with makeup brushes. Usually (after drooling over the new sparkly eyeshadow palettes, of course), that is the first area I will immediately run to while in Sephora, Ulta, or any Department store selling makeup.

There is such a great variety of brushes out there, some that I had no idea even existed. There is literally a brush specifically tailored for every single type of makeup application imaginable. This can sometimes be overwhelming, not to mention expensive!

But if you are ever in doubt of which type of brush to go with, ALWAYS choose the Kabuki brush. They are amazingly diverse, and while often pricey, you can’t go wrong, because there are just so many different ways to use it (in other words, you will definitely get your money’s worth)!

Kabuki brushes can be used to apply mineral powders, all-over bronzers, HD powders, setting powders, and highlighters, to name a few. My personal favorite use though, is to blend the makeup that has already been applied to your face, to soften any lines or creases, and remove any excess product. The brush’s synthetic bristles instantly create a smooth, even finish, making your face look flawless in a matter of seconds!

My recommendation: the Dior Kabuki Brush (#17), from their Backstage Brush line.  It’s slightly pricey at $52, but well-worth the investment. It NEVER sheds, is handmade and the all-natural hairs are never cut to ensure ultimate softness.


If you’re looking for something a bit less expensive to initially experiment with, try the adorably compact ‘Too Faced’ Kabuki brush for $32. According to reviews on Truebeauty.com, it “feels heavenly on your skin”, “buffs powder on beautifully, and minimizes pores like nobody’s business.”

**(This post was inspired by hollypopmatthews’ post on her Makeup Brush Collection from this morning.) 🙂
Do YOU have a favorite type/brand of Kabuki brush, or any tips/tricks to using them that you want to share? Let me know! 

How To Properly Clean Your Makeup Brushes

Published July 27, 2015 by shepic83

photo-1

How to Properly Clean Your Makeup Brushes

Cleaning makeup brushes is a time consuming, annoying process, and as a result is often neglected even though it is essential for hygienic purposes, as well as maintaining the integrity of your brushes.
Not surprisingly, a study at Loyola Marymount University found that there were significant amounts of bacterial activity on unwashed makeup brushes after just one week, and after two weeks, the bacteria had doubled.
Using bacteria-ridden brushes on your skin can cause acne and may even result in more serious problems, such as eye and skin infections. To make matters even worse, contaminated brushes can also transfer these unwanted germs into whichever products you are dipping them into.
Additionally, brushes that come into contact with cream or liquid products are even bigger breeding grounds for bacteria, as they thrive in moist conditions.

How to Properly Clean Your Brushes:

Put a squirt of a mild facial cleanser or shampoo onto your hand and swirl the brush around in it, letting water lightly run over your hand from the faucet. (Try your best to keep the handle of your brush dry to prevent the glue that holds it together from breaking down.) It is recommended to clean your brushes at least once per week.

How to Properly Dry Your Brushes:

It is best to clean your brushes at night, because it takes about 6-8 hours for them to dry completely. Lay your freshly cleansed brushes on a paper towel (which absorbs moisture better and faster than on a cotton or terry cloth towel). It is also very important to let your brushes dry flat, because it allows them to better maintain their shape.
It can be tempting to use a hair dryer to speed up the drying process, but this should be avoided, as the direct heat can melt the glue used to hold your brushes together. This can result in the shedding of your brush hairs, or even worse, make your brushes completely unusable.

In Between Cleanings:

Sometimes it is necessary to clean your brushes in between your regularly weekly cleansing process, especially if you are switching between highly pigmented colors (for a smokey eye application, etc). In this case, a store-bought daily brush cleaner spray can be useful. I would highly recommend Elf’s Daily Brush Cleaner ($3 at Target).

Elf

To use, simply spray brush several times after use, then wipe off on a clean towel or cloth to remove makeup. Allow to fully dry before next use.

Tell me, How do you clean YOUR brushes and how often?

Dry Brushing

Published July 26, 2015 by shepic83

Dry brushing is a popular spa technique that is an effective way to improve the appearance of your skin, and provide other health benefits as well. It is a great way to remove excess dead skin cells to make your skin look instantly brighter, smoother, and tighter (no gym membership required)! Recent studies have also determined that dry brushing (combined with other aspects of a healthy lifestyle) can also reduce the appearance of cellulite, improve kidney functions, and remove excess toxins from your body.

                    How It Works:

Dry brushing stimulates both the circulation and lymphatic system, which helps to rid the body of excess fluid and toxins, which in turn can also reduce the appearance of cellulite. Another added bonus: I’ve also found dry brushing to be great for exfoliating before using self-tanner.

                   How to Proceed:

  • Using a long handled, natural-bristled body brush, dry brush dry, bare skin twice a day before showering.
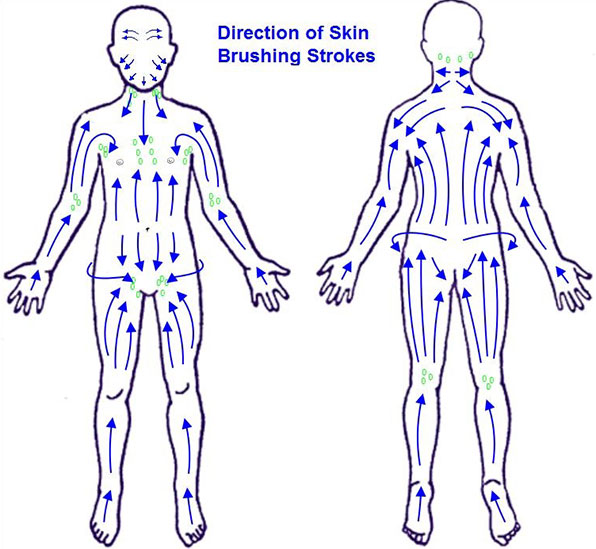
  • Begin with the bottoms of your feet, brushing them completely and vigorously in a circular motion, then move upward to the ankles, calves, thighs, stomach, arms, and hands. Be sure that you are brushing TOWARDS the heart, because this is where the lymphatic system naturally drains (please see the diagrams that follow for proper technique).
  • After brushing, shower with warm water to cleanse any leftover dead skin cells that you’ve just exfoliated. At the end of your shower, rinse with water as cold as you can stand it, to aid in additional blood circulation. Dry your skin completely with a towel (for additional exfoliation and circulation benefits).
  • Moisturize your skin thoroughly with a good lotion, or oil (such as coconut, olive, or almond).
  • Bonus tip: Sipping a cup of hot water with lemon during this process or right afterwards, can also help aid in the digestion process. 

       Full Benefits of Dry Brushing:

    • Aids in body circulation

    • Exfoliates the top layer of dead skin to unclog pores

    • Helps to regulate hormones

    • Stimulates the lymphatic system and detoxifies

    • Minimizes the appearance of cellulite

    • Boosts the immune system

    • Improves muscle tone

    • Decreases muscle tension and fluid retention

    • Stimulates nerve cells

    • Improves kidney and liver function

    • Increases energy

    • Stimulates blood flow to the surface of your skin for a healthy glow

drybrushbest

Bare Minerals ‘Round the Clock 6 PM – My New Favorite Eyeliner.

Published July 24, 2015 by shepic83

I attended a Master Makeup Class at Bare Escentuals this week with some of my favorite fellow Esti graduates, and not only did I score some sweet free Bare Minerals loot-

But I also discovered my new absolute favorite eyeliner, ever: ‘Round The Clock 6 PM’ (Violet).

I happened to choose violet because I have blue eyes, and purple pigments make blue stand out, but this amazing cream liner also comes in all of these fun, highly pigmented colors as well:


The reason I love this liner so much is because it’s actually waterproof, and when I say waterproof, I mean waterproof. I actually went swimming with this liner on and I swear to you that it literally did NOT budge. I also have pretty watery eyes (due to allergies and contact lenses), and on a typical workday, most “waterproof” eyeliners would be smudged under my eyes like a raccoon before lunch.

This liner, however, consistently stayed put, both on my actual waterline and my lid, from about 8 AM until well-past midnight. For me, the only time this stuff will come off, is with an oil-based makeup remover!! Each liner also comes with a sharpener, which is always a plus!

I would NOT recommend this product to those looking to do winged liner, or to anyone who likes a very thin, precise application along the lash line, as it is very creamy, and may turn out thicker than desired.

$16 – Bare Minerals